Building Galileo Image on Debian
Firstly, create a directory to do all the work
mkdir ~/ndn
cd ~/ndn
Pre-requisites
Install all the pre-requisite
sudo apt-get install vim gcc g++ git make build-essential subversion libcurl4-openssl-dev uuid-dev autoconf texinfo libssl-dev libtool diffstat gawk chrpath openjdk-7-jdk connect-proxy autopoint gettext p7zip-full gcc-multilib vim-common wget git-core iasl
Try iasl | head to see if ACPI 5.0 or up is supported. If you see something like
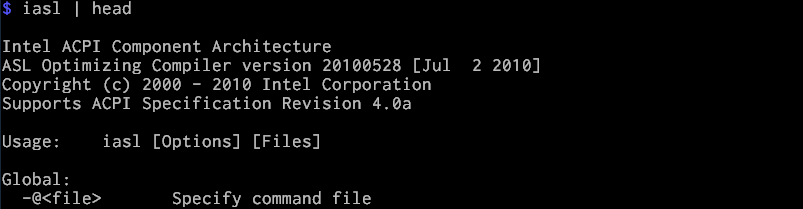
You will need to manually install it yourself.
Manual Installation for iasl
Pre-requisite of iasl:
sudo apt-get install libbison-dev flex
Getting and compiling iasl:
mkdir iasl
cd iasl
git clone https://github.com/acpica/acpica.git
cd acpica
make
Starting to use the newly built iasl:
sudo make install
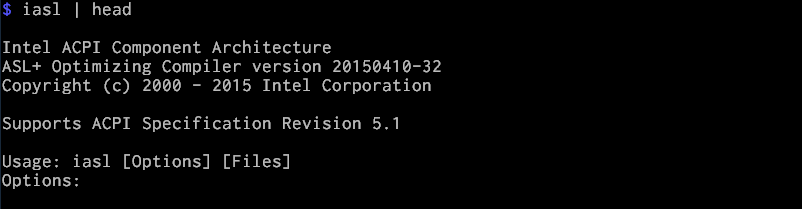
Again, try iasl | head to see if ACPI 5.0 or up is supported. It should be now.
A possible error may happen during iasl compilation, see remark at the end.
Getting Recipes
This is the specific meta package I use for my build: https://github.com/schwannden/Galileo-Runtime, which is forked from https://github.com/01org/Galileo-Runtime on 2015/2/1. I forked it because I intend to maintain it as a customized meta package for NDN development. So it is suggested you clone from my repository.
cd ~/ndn
git clone https://github.com/schwannden/Galileo-Runtime
cd Galileo-Runtime
Because we are building an SD card image, we need only the following two folders:
This is the major folder that contains all the recipes for building galileo
tar -xzf meta-clanton_v1.0.1.tar.gz
This contains all the patches
tar -xzf patches_v1.0.4.tar.gz
Firstly, we apply the patches. The script will in turn calls the setup.sh in meta-clanton_v1.0.1 to clone addition meta folders (meta-oe and meta-intel) and apply the patches
./patches_v1.0.4/patch.meta-clanton.sh
Now, if you do ls meta-clanton_v1.0.1, you can see all the meta directories.

Because NDN project requires Boost library, which is not provided by default, we need to get it at Open Embedded Metadata Index. Go to Open Embedded Metadata Index, one can see boost is provided. Go to boost index, at the time of writing, they provide boost 1.57, which is not suitable for NDN development. We can find an older version of boost 1.55 here, in the download section. Download and extract this file:
wget http://cgit.openembedded.org/openembedded-core/snapshot/openembedded-core-e0bc74e14f7ad67ff85959ce7c0a111d05ac7f2f.tar.gz
tar -xzf openembedded-core-e0bc74e14f7ad67ff85959ce7c0a111d05ac7f2f.tar.gz
All we need is boost's recipe, so copy the boost folder into one of the working directory's meta-* folder. Since this is provided by Open Embedded, let's copy it into meta-oe folder.
cd openembedded-core-e0bc74e14f7ad67ff85959ce7c0a111d05ac7f2f
cd meta/recipes-support
cp -r boost ~/ndn/Galileo-Runtime/meta-clanton_v1.0.1/meta-oe/meta-oe/recipes-support
Now we have all we need for building Galileo image!
Applying Changes
cd ~/ndn/Galileo-Runtime/meta-clanton_v1.0.1
First we need to edit the image recipe to make sure all relevent packges are in Galileo. Edit meta-clanton-distro/recipes-core/images/image-full.bb
- Increase the image filesystem ten times to around 3 G:
IMAGE_ROOTFS_SIZE = "3072000" - Add features:
IMAGE_FEATURES += "package-management dev-pkgs"The added optiondev-pkgsmeans install the development packages (headers and extra library links) for all packages installed in a given image. - Add packages
IMAGE_INSTALL += "autoconf automake binutils binutils-symlinks cpp cpp-symlinks gcc gcc-symlinks g++ g++-symlinks gettext make libstdc++ libstdc++-dev file coreutils boost"
Then edit meta-oe/meta-oe/recipes-support/boost/boost.inc to add chrono and random libraries. These two libraries are not installed by default but are needed for NDN development. (One can find out what boost libraries are required in .waf-tools/boost.py.)
  7 BOOST_LIBS = "\
  8         date_time \
  9         chrono \
 10         random \
 11         filesystem \
 12         graph \
 13         iostreams \
 14         program_options \
 15         regex \
 16         serialization \
 17         signals \
 18         system \
 19         test \
 20         thread \
 21         "
There is a known removed repository. Edit meta-clanton-bsp/recipes-bsp/grub/grub_0.97.bb and you have the following two options:
Use
git://github.com/mjg59/grub-fedora.gitby changing the line of SRC_URI asSRC_URI = "git://github.com/mjg59/grub-fedora.git"Use
git://github.com/architech-backup/grub-fedora.gitby changing the line of SRC_URI asSRC_URI = "git://github.com/architech-backup/grub-fedora.git"and the line of SECREV as
SRCREV = "f72d4d83931f7a6427771b480101e251a57ac1b8"
Building Images
cd ~/ndn/Galileo-Runtime/meta-clanton_v1.0.1
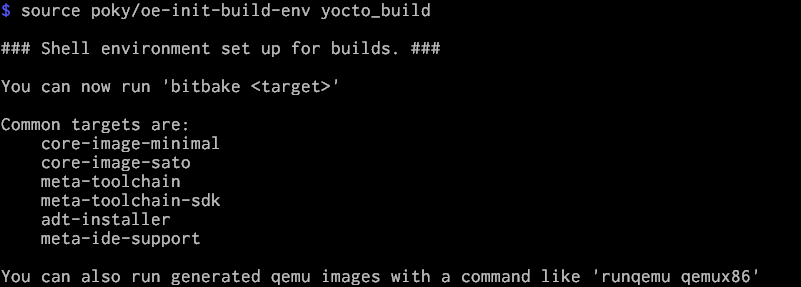
First, set up the environment. oe-init-build-env will set up the environment variables for Yocto build system and automatically change directory to the build directory. The default is build/, but here we specify yocto_build/.
source poky/oe-init-build-env yocto_build
Now you should be in yocto_build/ directory, simply build the image by using:
bitbake image-full-galileo
It takes a long time, probably a couple of hours, to finish. On my Intel i5 it takes 2 hours. Do not panic if you see warnings and errors. Sometimes the network in not stable, or the required repository is temporarily unavailable. The process consequently gets a time-out when fetching some packages. Just relaunch the building process repeatedly. In case a repository is really dead, add an alternative live repository (this is more complicated, see Debug Yocto).
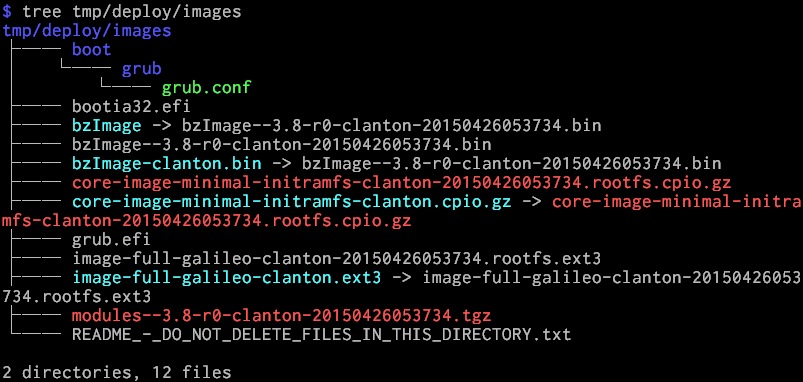
If the building process succeeds, the image will be created in directory yocto_build/tmp/deploy/images/.
If you do tree tmp/deploy/images, you should see
Copying images to SD card
Galileo uses micro SD card, so a machine that reads micro SD card is needed for this step. I use a micro SD to SD card adapter for convenience. In Debian, we can simply use the Disk Utility in Applications/Accessories/Dist Utility to format the (micro) SD card. First format the SD card into the Master Boot Record (MBR) scheme, then add a FAT partition, and copy the following 5 files from yocto_build/tmp/deploy/images/ onto the card.
- boot/
- bzImage
- core-image-minimal-initramfs-clanton.cpio.gz
- grub.efi
- image-full-galileo-clanton.ext3
If the way with which you use to copy perserves the symbolic links, you may need to change the behavior, such as adding -L or --dereference to cp. If you would like to directly copy the actual files, renaming some files is required, because Yocto inserts the date-time as part of the file name on each build. As you might see, for example, image-full-galileo-clanton-20150426053734.rootfs.ext3.
Now, insert the micro SD card into Galileo, and you are all set for booting your Galileo image. By default, the image has the ssh server daemon starting on boot with the standard ssh port (22) and user root with no password. If, for some reason, networking is not availale, you can use a FTDI232 TTL 3.3V cable with an appropriate terminal software, such as PuTTY in Windows, to connect to the serial console of Galileo for troubleshooting.
- See Boot From SD Card for more detail.
- See Debug Galileo for some hacks on debugging and connecting to Galileo.
Remark
iaslbug
At the time of writing (before acpica commit 8e2118), the Makefile for iasl treats warning messages as fatal, causing the compilation to fail due to line 660 of source/components/events/evgpe.c with usage of an uninitialized variable Status. Just initialize Status to 0 at line 635 and make it.